Simple DIY Pinhole Projector
Looking for ways to safely view the upcoming solar eclipse? Why not build your own pinhole projector? With just a few household supplies and some simple instructions, these DIY eclipse projects provide a great way for students to engage in eclipse science. Check out the DIY guide below, and visit PASCO’s eclipse page to learn more about the upcoming eclipses!
Materials:
- Two large white cards (cardstock, poster board, or even paper plates will do!)
- Pushpin (or something to poke a small hole through the paper)
- Sunshine!
Directions:
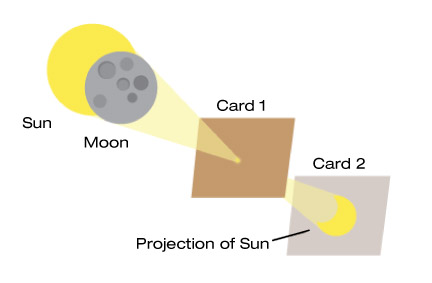
- Using the pushpin, poke a small hole in the center of one of the cards. Make sure the hole is circular.
- Facing away from the sun, hold the card up near your shoulder so sunlight can pass through the pinhole.
Hold or mount the second card closer to the ground so it’s aligned with the punctured card. You should be able to see a small circle of light projected onto the second card.
This is an inverted image of the Sun! During a solar eclipse, the shape of light on the card will be crescent-shaped as the moon passes in front of the Sun.
Pinhole Projector Box
Materials:
- Cardboard box (a shoebox or larger is a good size)
- White piece of printer paper
- Duct tape
- Box cutter
- Aluminum foil (3”x3” square)
- Pushpin (or something to poke a small hole through the paper)
- Sunshine!

Directions:
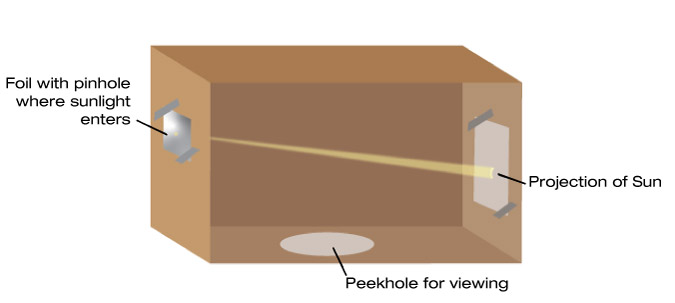
- Using the box cutters, cut out a square in the center of one of the sides of your cardboard box. If you have a rectangular box like a shoebox, cut out the square on one of the shorter sides. The square should be about 2”x2” in size.
- Tape the printer paper inside of the box on the opposite side from the square cutout. (You should be able to look through the cutout and see the paper.) The paper will act as the “screen.”
- Tape the aluminum foil completely over the square cutout.
- Use the pushpin to puncture a small hole in the center of the aluminum foil.
- Cut out a large hole in the bottom of the box. This will be the peek-hole where you look into the box to view the projection. If you have a large box, you can cut the hole large enough to fit your head through. Try to limit excess light from entering the box so the projection of light through the pinhole isn’t obstructed.
Now it’s time to test your projector! Find a sunny spot outside and hold your box up to the sun so light can enter the pinhole. When you look through the peek-hole, you should see a circle of light on the paper. This is a projection of the Sun! The longer your box is, the larger the projection will appear on the paper. During a solar eclipse, the projection will resemble a crescent as the moon passes in front of the Sun.
Why does the image through a pinhole appear inverted?
Viewing an eclipse through a pinhole projector creates an upside-down image due to a phenomenon known as the camera obscura effect. A pinhole projector works by allowing light from the Sun to pass through a small hole and project an inverted image of the Sun on a surface, such as a piece of paper, located opposite to the hole.
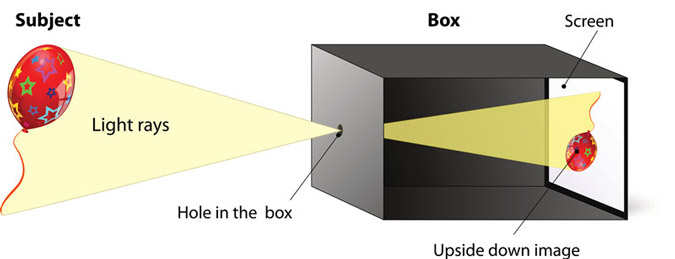
The camera obscura effect occurs because light travels in straight lines and the pinhole only allows a small amount of light to pass through it. As a result, the rays of light that pass through the top of the pinhole will be projected on the bottom of the screen and vice versa, causing the image to be inverted. This is the same principle that applies to the images formed by a camera lens or our eyes, which also produce inverted images on our retina before our brain processes them and flips them right-side up.