English Français

1-877-967-2726

Month: September 2019

Using the PASCO Smart Cart to Teach the Right-Hand Rule

We high school physics teachers tend to associate the right-hand rules with electromagnetism. As a student, my first encounter with a right-hand rule was when I was introduced to the magnetic field produced by the electric current in a long, straight wire: if you point the thumb of your right hand in the direction of the conventional current and imagine grasping the wire with your hand, your fingers wrap around the wire in a way that is analogous to the magnetic field that circulates around the wire.

I only later discovered that this same rule can be applied to rotational quantities such as angular velocity and angular momentum. The topic of rotation has become more important in AP physics when the program was updated from the older Physics B program. Strictly speaking, AP Physics 1 does not include the use of the right hand rule for rotation, but I have found that introducing it actually helps solidify student understanding of angular vectors.

Describing the direction of rotation as being clockwise or counterclockwise is helpful only if all parties involved have a common point of view, which is ideally along the axis of rotation. As with left and right, clockwise and counterclockwise depend on your point of view. This is why it is often preferable to describe translational motion in terms of north, south, east, west, up, and down, or with respect to a defined x-y-z coordinate system; directions can be communicated unambiguously, provided that everybody uses the same coordinate system.

It is precisely for this reason that the right hand rule can (and should) be used for rotational motion. Consider the hands of an analog clock. Assuming that the clock is a typical one, it will have hands that turn “clockwise” when viewed from the “usual” point of view, but if the clock had a transparent back and you were to view it from the back you would see the hands turning “counterclockwise!” The observed direction of rotation (clockwise or counterclockwise) depends on the observer’s point of view.

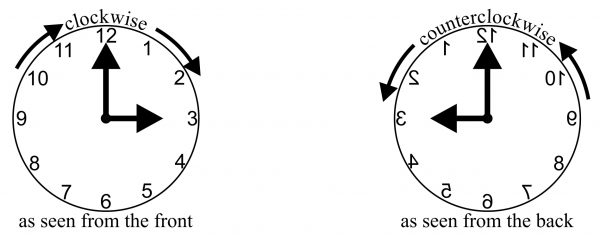
Instead of using clockwise and counterclockwise, we can describe the direction of rotation with a right hand rule: if you curl the fingers of your right hand around with the direction of the rotational motion, your thumb will point in the direction of rotation, which will be along the axis of rotation. Applying this to the above we find that when viewing a clock from the front, the rotation of the hands is three dimensionally into the clock (away from the observer), and when viewing a clock from the back side, the rotation of the hands is three dimensionally out of the clock (toward the observer). If two people view a transparent clock at the same time but one observes it from the front while the other observes it from the back (i.e. the clock is between the two people who are facing each other), they will disagree on which way the hands turn (clockwise or counterclockwise) but will agree on this direction if both use the right hand rule convention to describe the direction of the rotational motion – both observers will agree that it is directed toward the person viewing the back side of the clock.

When first learning about the right hand rule, students are often initially confused, with many students failing to grasp why such a rule is even useful in the first place. Before introducing the right hand rule I like to begin by holding an object such as a meter stick while standing at the front of the classroom. I then rotate the meter stick through its center so that the students claim that it is rotating “clockwise” when asked. Being careful to keep the rotational motion as constant as possible, I then walk to the back of the room. It’s important that the students see that at no point did I stop the rotation of the meter stick – it is still turning the same way as before, and yet at some point each student finds that they must turn around in order to continue to see it. Many students are astonished to see that the meter stick is now rotating counter clockwise from their (now reversed) point of view. This helps establish the need for a better way to describe rotation.

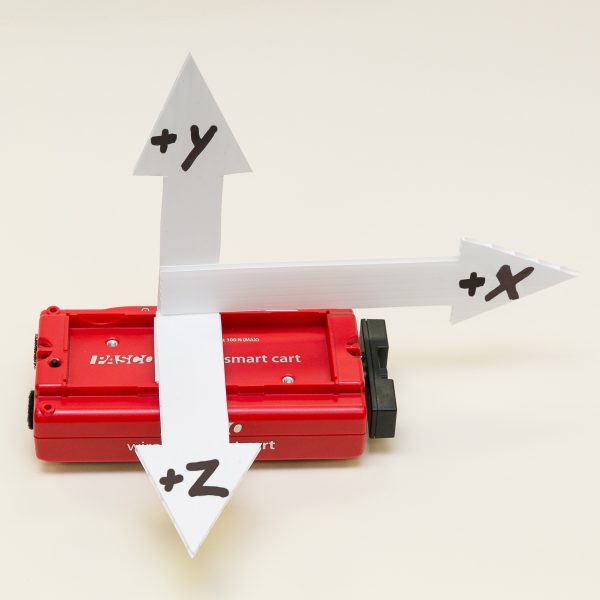
I then introduce the right hand rule and go through a couple of examples. Traditionally, this would have been the end of it, but last year I was able to take advantage of my newly acquired PASCO Smart Cart, which has a wireless 3-axis gyroscope (i.e. rotational sensor). The coordinate system is fixed with respect to the cart, and is printed on the cart itself, but I like to make this more visible by attaching cardboard cutout vectors onto the cart which make the axes more visible to the students while I hold the cart up for them to see. I then set up a projected display of the angular velocity of the cart along each axis simultaneously. I then ask the students how I must turn the cart in order to get a desired rotation of my choosing (i.e. ±x, ±y, and ±z).

I really like how the carts, along with the live display of the 3 angular velocity components make the admittedly abstract right hand rule so much more concrete. Seeing the display agree with our predictions makes it so much more real and is much, much better than me merely saying “trust me.” I have found that introducing and using this right hand rule with rotation has made using this same rule much more natural when using it to later relate the direction of current flow and the magnetic field.

PASCO’s Exceptional 5-year Warranty

Most companies offer a one year warranty, and a smaller number have an extended warranty for two years.  PASCO’s five year warranty is exceptional and is demonstrative of a company that has immense confidence in the products they manufacturer and also capability to live-up to its promising when an issue arises.

“Happy customers are repeat customers, and keeping our word and your trust is simply good for business.”

                                                                                                            PASCO Teacher Support Team


What’s the catch?  Will PASCO really repair or replace a defective product for 5 years?  The answer is yes!  As long as the product was not tampered with or damaged due to misuse, PASCO will repair or replace the unit in a timely and efficient manner

A hassle-free process – PASCO does not want you to waste your valuable time and energy by needlessly jumping through hoops.  To process a warranty claim, a simple short conversation is often all that is required.  If a repair is required, return labels and shipping instructions will be quickly emailed.

Why PASCO can afford such a long warranty

Products are designed for student use – Student labs can be tough – really tough – on equipment.  PASCO has 55 years of experience producing long-lasting high quality instructional equipment and educational technology.  Thoroughly testing products before shipping to customers is also a critical step in the process.

Always be prepared – is the famous Scout moto that is central to PASCO’s commitment to honoring its warranty promise.  For at least 5 years after purchase PASCO will maintain a dedicated inventory of replacement units – even for products that have been discontinued.  In addition, PASCO has an extensive inventory of replacement parts and occasionally surprises customers (in a very pleasant way) by helping revive an old but still valuable piece of equipment that was purchased decades ago.

Independent (Remote) Datalogging

In logging mode, wireless sensors collect data to their onboard memory for hours, days, weeks or even months at a time without needing to be connected to a computer, tablet, Chromebook or smartphone.

When the experiment concludes, simply connect the sensor to a device running PASCO software and download all the measurements it recorded.

How much does a windshield screen affect the temperature inside a car on a hot day? Using Wireless Temperature Sensors in logging mode makes it easy to find out.


Set up remote logging

Collect data directly on a Wireless Sensor instead of a computer or mobile device.

Note: Remote Logging is only available for PASCO Wireless Sensors.

  1. Open SPARKvue or click then select Start New Experiment.
  2. Click Remote Logging:
  3. Turn on the sensor then click the sensor which matches the device ID.

  4. Configure remote logging for each sensor:
      1. Select a sensor to configure from the Sensor menu.
      2. Toggle Sensor Enabled to Off if you don’t want to log data with this sensor.
      3. Set the Sample Rate using the left and right arrows. Toggle Common Sample Rate to Off to set different sample rates for each sensor.

    Tip: The configuration window indicates the amount of time that the sensor can log data below the sample rate. To increase the logging time:

      • Decrease the sample rate.
      • Disable unused sensors.
  5. Optional: Toggle Sensor Button Deferred Logging to On to start data logging by pressing the power button on the sensor.
  6. Click OK.

Data logging begins immediately after you click OK or press the power button on the sensor (if you selected Sensor Button Deferred Logging). The Bluetooth status light blinks yellow and green until data logging begins. When the sensor starts logging data, the Bluetooth status light blinks yellow.

Click OK and close SPARKvue. To stop data logging, turn off the sensor or connect it to SPARKvue to download the data.

Download remotely logged data

Download data remotely logged on a Wireless Sensor for data analysis. You can download the data to multiple devices as long as data isn’t deleted from the sensor after downloading it.

  1. Open SPARKvue or click then select Start New Experiment.
  2. Click Remote Logging .
  3. Turn on the sensor or press the power button if the sensor is currently logging.
    Note: The sensor doesn’t appear in Wireless Devices when the Bluetooth status light blinks yellow. Press the power button to make the sensor appear.
    Tip: Connect the sensor using USB, if available, to download data at a faster rate.
  4. Select the sensor under Sensors with data.
  5. In the Logged Data window, select Download Data.
  6. Select a method to download the data:
    • Templates
      Use this method to download the data into a new file.

      1. In the Select Measurements for Templates panel, select up to three measurements to display.
      2. In the Templates panel, select a template or a Quick Start Experiment to display the selected measurements.
    • Quick Start Experiments
      Use this method to download the data to a new Quick Start Experiment file. Names of Quick Start Experiments appear if available for the connected sensor.

      Select a Quick Start Experiment from the list, if available.

    • Add to existing experiment
      Use this method to download the data to an existing experiment file.

      1. Click Open PASCO Experiment or Open Saved Experiment.
      2. Select a file to open.


Save & Share Cart
Your Shopping Cart will be saved and you'll be given a link. You, or anyone with the link, can use it to retrieve your Cart at any time.
Back Save & Share Cart
Your Shopping Cart will be saved with Product pictures and information, and Cart Totals. Then send it to yourself, or a friend, with a link to retrieve it at any time.
Your cart email sent successfully :)