English Français

1-877-967-2726

Solar Eclipse Activities & Resources

Want to conduct your own experiments during this year’s solar eclipse? Give your students the science experience of a lifetime with these free solar eclipse activities. These free activities can be performed with students of all ages and include step-by-step instructions, analysis questions, and preformatted software files for students.

Light and Temp Study

Solar Eclipse Light and Temperature Study

In this lab, students become junior eclipse scientists as they use Wireless Light and Temperature Sensors to track how light and temperature change during a solar eclipse.

Weather Study

Weird Weather: Solar Eclipse Weather Study

Strange things happen during a solar eclipse! This lab lets students uncover local changes in weather conditions using a Wireless Weather Sensor with GPS.

UV Light Study

Why Do We Wear Eclipse Glasses? A Study with UV Beads

In this sensor-free activity, students use UV beads to compare the effectiveness of sunglasses and eclipse glasses in blocking UV light.

Protect Your Eyes with PASCO Eclipse Glasses!

PASCO Glasses

Safety is essential when witnessing any solar eclipse.
Ensure your students are protected with our certified eclipse glasses!

Simple DIY Pinhole Projector

Looking for ways to safely view the upcoming solar eclipse? Why not build your own pinhole projector? With just a few household supplies and some simple instructions, these DIY eclipse projects provide a great way for students to engage in eclipse science. Check out the DIY guide below, and visit PASCO’s eclipse page to learn more about the upcoming eclipses!

Materials:

  • Two large white cards (cardstock, poster board, or even paper plates will do!)
  • Pushpin (or something to poke a small hole through the paper)
  • Sunshine!


Directions:

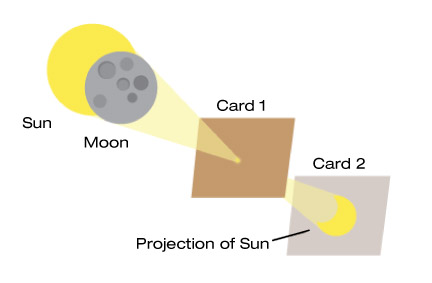
  1. Using the pushpin, poke a small hole in the center of one of the cards. Make sure the hole is circular.
  2. Facing away from the sun, hold the card up near your shoulder so sunlight can pass through the pinhole.
    Hold or mount the second card closer to the ground so it’s aligned with the punctured card. You should be able to see a small circle of light projected onto the second card.

This is an inverted image of the Sun! During a solar eclipse, the shape of light on the card will be crescent-shaped as the moon passes in front of the Sun.

Pinhole Projector Box

Materials:

  • Cardboard box (a shoebox or larger is a good size)
  • White piece of printer paper
  • Duct tape
  • Box cutter
  • Aluminum foil (3”x3” square)
  • Pushpin (or something to poke a small hole through the paper)
  • Sunshine!

Directions:

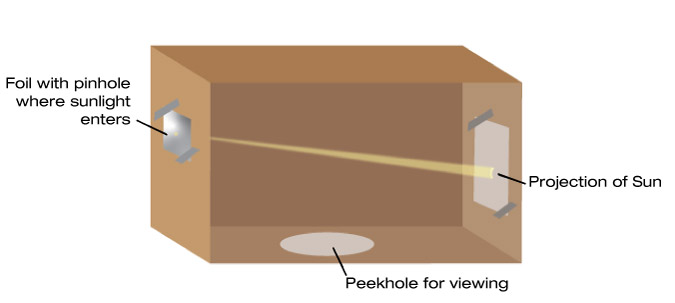
  1. Using the box cutters, cut out a square in the center of one of the sides of your cardboard box. If you have a rectangular box like a shoebox, cut out the square on one of the shorter sides. The square should be about 2”x2” in size.
  2. Tape the printer paper inside of the box on the opposite side from the square cutout. (You should be able to look through the cutout and see the paper.) The paper will act as the “screen.”
  3. Tape the aluminum foil completely over the square cutout.
  4. Use the pushpin to puncture a small hole in the center of the aluminum foil.
  5. Cut out a large hole in the bottom of the box. This will be the peek-hole where you look into the box to view the projection. If you have a large box, you can cut the hole large enough to fit your head through. Try to limit excess light from entering the box so the projection of light through the pinhole isn’t obstructed.

Now it’s time to test your projector! Find a sunny spot outside and hold your box up to the sun so light can enter the pinhole. When you look through the peek-hole, you should see a circle of light on the paper. This is a projection of the Sun! The longer your box is, the larger the projection will appear on the paper. During a solar eclipse, the projection will resemble a crescent as the moon passes in front of the Sun.

Why does the image through a pinhole appear inverted?

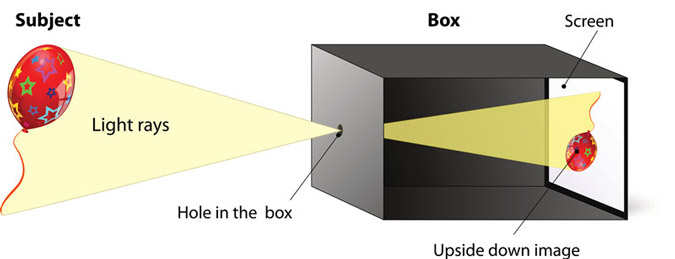
Viewing an eclipse through a pinhole projector creates an upside-down image due to a phenomenon known as the camera obscura effect. A pinhole projector works by allowing light from the Sun to pass through a small hole and project an inverted image of the Sun on a surface, such as a piece of paper, located opposite to the hole.

The camera obscura effect occurs because light travels in straight lines and the pinhole only allows a small amount of light to pass through it. As a result, the rays of light that pass through the top of the pinhole will be projected on the bottom of the screen and vice versa, causing the image to be inverted. This is the same principle that applies to the images formed by a camera lens or our eyes, which also produce inverted images on our retina before our brain processes them and flips them right-side up.

Eclipse Safety

It is never safe to look directly at the Sun. Looking directly at the Sun during a solar eclipse–or ever–is very dangerous, and can cause permanent eye damage or blindness. To protect your vision, specialized solar viewing glasses or indirect viewing methods should always be used to observe a solar eclipse.

If you plan to view a solar eclipse using specialized glasses, be sure to check that they’re legitimate. Solar eclipse glasses should be thoroughly inspected and meet specific safety requirements for certification.

Protect Your Eyes with PASCO Eclipse Glasses!

PASCO Glasses

Safety is essential when witnessing any solar eclipse.
Ensure your students are protected with our certified eclipse glasses!


SPARKvue is now completely free as a browser-based application!

We’re excited to announce SPARKvue is now available free of charge on all your devices as a browser-based application.

This new version of our software as a Progressive Web Application (PWA) means you have free access to all the features of SPARKvue from Google Chrome and Microsoft Edge browsers. That’s right: No download fees, subscription fees, or update fees, even for Windows® and Mac®. Plus, the app is always updated to the latest version automatically, so you never have to worry about it.

Access SPARKvue from your Google Chrome and Microsoft Edge browser from any device–online or offline–and start collecting data with three simple steps:

  1. Open Browser
  2. Download SPARKvue
  3. Connect PASCO Sensors

Try SPARKvue in your browser today!

Watch the video below to get started:

SPARKvue (PWA) is designed for use on laptops, computers, and Chromebooks. To download SPARKvue for your iPhone or iPad, download the free SPARKvue app on the App Store. For Android devices, get SPARKvue on Google Play. Skip to the article section, Free Apps for Android and iOS Devices, for links to download SPARKvue to your mobile device.


System Requirements

Windows
  • Windows 10 or later
  • Processor: Intel i3 1st Gen (or equivalent) or later
  • RAM: 4GB or greater
  • Disk Space: 349 MB
  • Resolution: 1024 x 768 or higher
Mac
  • Mac OS v 10.14 or later
  • Processor: Intel i3 1st Gen (or equivalent) or later, or Apple M1 (using Rosetta 2)
  • RAM: 2 GB or greater
  • Disk Space: 504 MB
  • Resolution: 1024 x 768 or higher
Chromebook
  • It is recommended to be on the latest OS the machine supports
iOS
  • iOS v13 or later. Compatible with iPhone, iPad, and iPod touch.
Android
  • Android v7.1 or later. Compatible with tablets or phones.

Free Apps for Chromebook, Android, and iOS Devices

These free SPARKvue apps provide the complete software install so that the user experience is the same regardless of platform. Updates for these apps are handled via direct notification and installation on your device, including SPARK LX/LXi users.

Chromebook Devices

Get SPARKvue for Chrome OS devices in the Chrome Web Store.

Chrome Web Store

Android Devices

Get SPARKvue for Android based phones & tablets on Google Play.

Google Play Store

iOS Devices

Get SPARKvue for Apple iPhones & iPads in the App Store.

Apple App Store

Sideloading on Android

Android users who do not have access to Google Play may optionally sideload the application by downloading the SPARKvue APK and following this Knowledge Base article. This includes updating SPARKvue on PASCO’s SPARK LXi/LX Dataloggers.

Need the 64-bit installers for Windows and Mac for a local installation? Click here.

In-app Updates for Windows® and Mac® Computers

Existing users of SPARKvue on Windows and Mac computers may update to the latest version using the in-app update feature. Simply launch the SPARKvue application and choose “Check for Updates” from the file menu to get started.

How does the PASCO Smart Cart Compare to the Vernier Go Direct® Sensor Cart?

Smart Cart Comparison Banner

How does the PASCO Smart Cart Compare to the Vernier Go Direct® Sensor Cart?

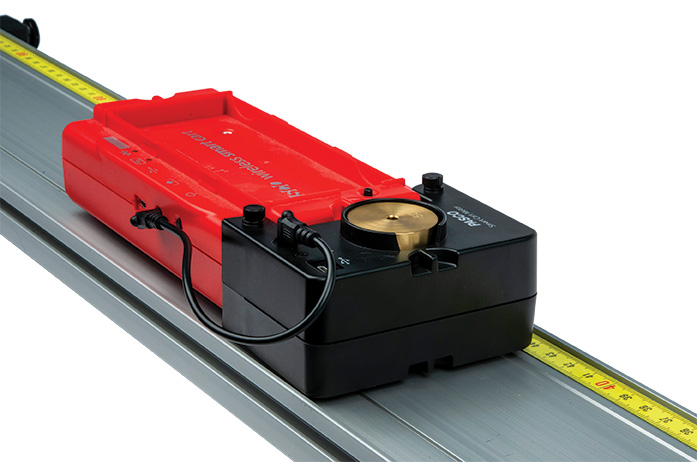
The Smart Cart may appear to be equivalent to competitors like Vernier’s Go Direct Sensor Cart–they include many of the same features and specifications–but several distinctions set the PASCO Smart Cart apart.

What’s the Same?

Both Measure:

  • Position
  • Velocity
  • Acceleration
  • Force

Both Feature:

  • Wireless software connection
  • Use on or off a track
  • Plunger

Both Include:

  • USB Cable
  • Rubber Bumper
  • Hook

What’s Different?

PASCO Includes More

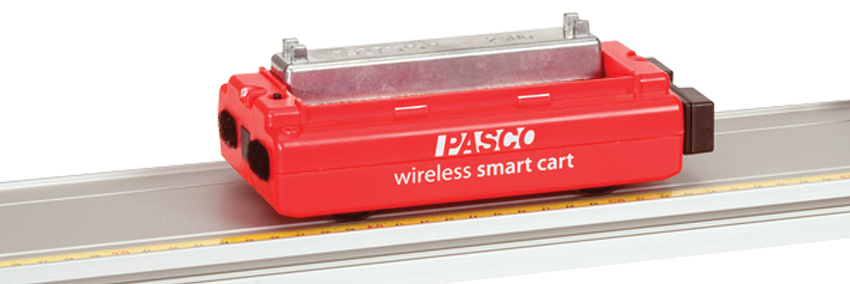
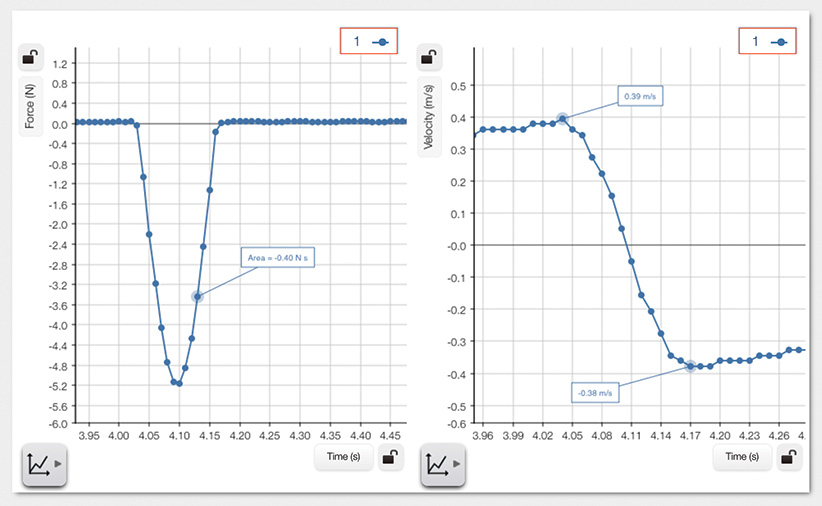
The PASCO Smart Cart comes with both hook and loop and magnetic bumpers. The magnetic bumper attaches to the force sensor, enabling you to measure the impulse during a collision. You must order bumpers separately for the Vernier sensor cart.

Smart Cart Callout

Why?

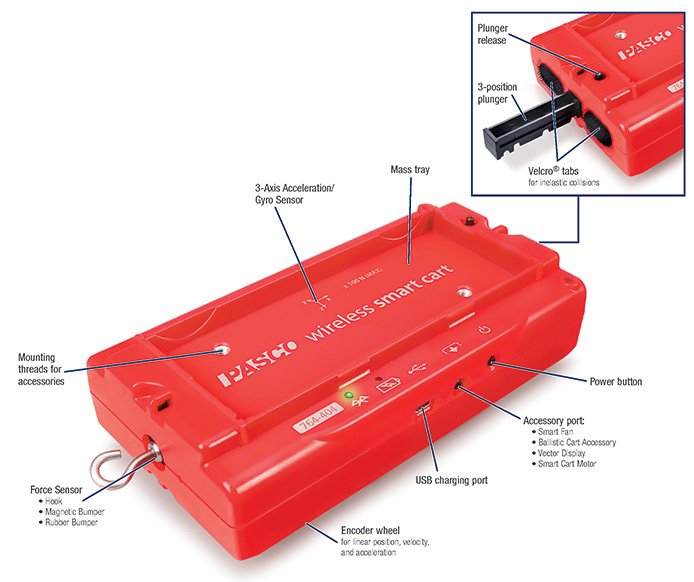
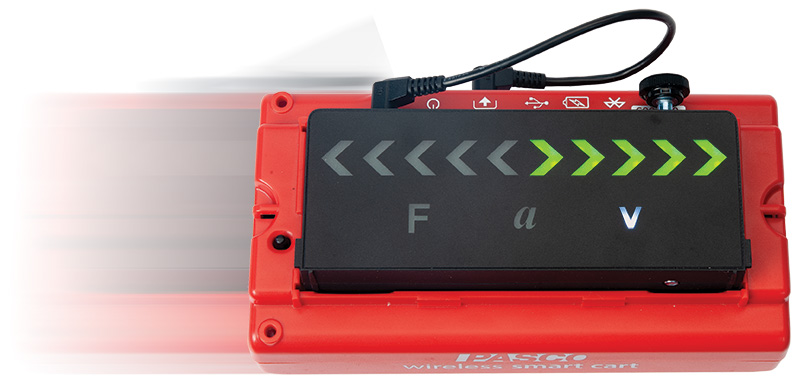
PASCO’s design makes it easy to launch the cart at 1x, 2x, and 3x velocities. With F, 2F, and 3F settings built-in to the Smart Cart, students can spend more time gathering data and solving for unknown variables and less time fiddling with cart settings.

This is important because you want to do more collisions, and with included bumpers, you can. Use the hook and loop tabs for inelastic collisions, magnetic bumper for elastic collisions, or unscrew the magnet and replace it with the rubber bumper for harder impacts.


Simple to Use Plunger

The Smart Cart plunger easily clicks into 3 different settings that correlate proportionally to 1, 2, and 3 units of force. By simply pressing the plunger to your desired setting, you can easily launch the Smart Cart at three different velocities that correlate to 1F, 2F, or 3F. Vernier’s plunger does not click into distinct velocity settings. What’s more, the total range of force on the Vernier cart is smaller than the range available to the Smart Cart, as you can only increase the force on the Vernier cart up to 1.3x.

Why?

PASCO’s design makes it easy to launch the cart at 1x, 2x, and 3x velocities. With F, 2F, and 3F settings built-in to the Smart Cart, students can spend more time gathering data and solving for unknown variables and less time fiddling with cart settings.

Larger Load Cell Capacity

PASCO’s Smart Cart load cell capacity is ±100N, double that of Vernier’s cart which is ±50N.

Why?

A larger load cell capacity means students are less likely to damage the sensor. Measure larger impulses and create collisions with higher impact. Since the sensor can withstand 100N, it is less likely to break during a tug-of-war demonstration of Newton’s 3rd Law.

Smart Cart Rubber Band Experiment

Sealed & Protected Encoder Wheel

PASCO’s encoder wheel is internal and connects to the axle of an existing wheel. Vernier’s encoder wheel is an exposed 5th wheel on the underside of their Sensor Cart.

Why?

A built-in optical encoder wheel means it is sealed and protected from everyday student use. It won’t fall victim to dust, grime, or student abuse, ensuring your data is as accurate as possible for kinematics studies.

Higher Encoder Sampling Rate

PASCO’s Smart Cart encoder maximum sampling rate is 500Hz. Vernier’s rate is 30Hz.

Why?

A higher sampling rate means you can collect more data points! This is important to match a higher sampling rate of the force sensor during impulse experiments.

Smart Cart Magnetic Collision

PASCO Doesn’t Manipulate the Data!

Vernier’s software performs data smoothing automatically so it cannot be turned off completely.

Why?

You’re a science educator who wants your students to collect and graph the real data, so that’s what we give you.

3-Axis Gyro

PASCO’s 3-axis accelerometer includes a 3-axis gyro, and Vernier’s 3-axis accelerometer does not.

Why?

The gyro allows you to measure angular velocity right out of the box so you can study centripetal force.

EX-5551 Graph

No Bumper Assembly Required

No classroom management or assembly is required to ensure the magnetic bumper is the correct orientation (north and south poles) for the Smart Cart. For the Vernier cart, you must assemble all magnetic and velcro bumpers separately, and make sure the four pieces for each Vernier cart are accounted for.

Smart Cart with Mass

Why?

Fewer pieces and minimal assembly means easier setup, easier cleanup, and less items to lose–giving you more time for investigations.


Bluetooth Time Sync Within & Between Carts

We’ve engineered our Smart Carts to time-synchronize all on-board sensors; In other words, force data syncs with velocity data from the encoder. Further, data also syncs between multiple carts in a collision so the data from both carts lines up. Vernier’s data is out of sync, and synchronization worsens as sampling rate increases.

Why?

Dependable time sync between carts means your data and graphs correlate with the phenomenon, making it easy for your students to interpret what their data is showing.

Proportional Smart Cart Masses

The Smart Cart and masses are proportional and stackable; the Smart Cart is 250 grams and the cart masses are each 250 grams. Vernier’s cart is 286 grams and the masses are 125 grams which creates strange multiples of total mass as you add masses.

        Why?

Stackable and proportional masses create conceptual demonstrations and easier numbers to work into equations, aiding students in understanding core concepts.

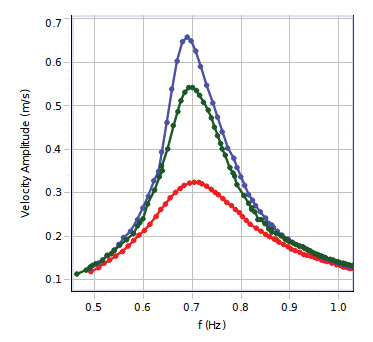
Force Velocity Graph

More Accessories Available

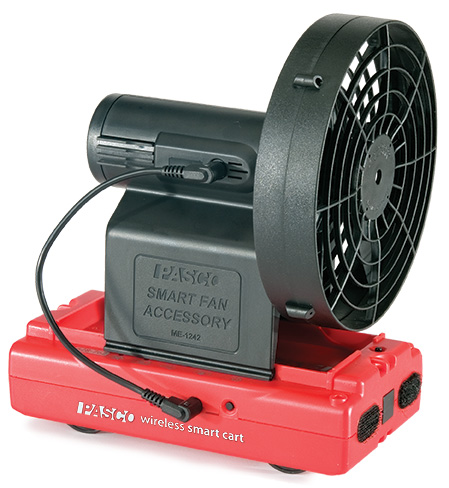
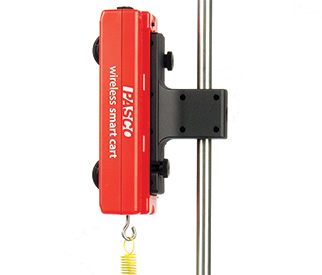
PASCO has several add-ons that pair seamlessly with our Smart Cart’s design, including a Smart Fan, Smart Ballistic Accessory, Rod Clamp, Vector Display, and Motor. Vernier does not offer any of these accessories.

Smart Cart with Fan

ME-1244 in use


Why?

Do more physics! PASCO’s accessories are designed to easily attach to the Smart Cart so students can examine core physics concepts. Also, when you connect a Smart Accessory to the Smart Cart, the Smart Cart can control the accessory for customizable investigations!


Smart Cart Front Track

ME-1246 View from Top


With an unparalleled design and countless applications in the physics lab, the PASCO Smart Cart will undoubtedly become one of your favorite teaching tools!

Back to School Resources for Fall ’23

Fire up that printer! Charge those devices! Brew that coffee! It’s back to school season everyone, and we’re sharing our top eight tech tips and resources to help you prep like a pro.

Most PASCO sensors and interfaces don’t require any maintenance, but a quick tune-up before school starts can help prevent surprises during class time.

Relevant Resources
Knowledge Base: Updating Firmware for Wireless Sensors and Interfaces
Video: Update the Firmware on a Wireless Sensor (Capstone)
Video: Pre-lab Prep for Chromebooks (SPARKvue)


Skip the chaos of in-class software updates by making sure your class devices are running the latest versions of SPARKvue (v4.9.1) or PASCO Capstone™ (v4.6.1) software prior to starting a lab.

SPARKvue
PASCO Capstone™


Whether you use laptops, Chromebooks, or desktop computers, updating to the latest Bluetooth driver helps ensure your PASCO sensors connect reliably to classroom devices.

Relevant Resources
Knowledge Base: Wireless Sensors not Detected on Windows with PS-3500 Adapter
Video: How to Determine the Bluetooth Version of My PASCO Device
Knowledge Base: How Do I Troubleshoot Connecting a Wireless Sensor?

Check that the sensors you’ll be using this year are in working condition. Replacement parts and consumables, such as electrodes and carbon paper, can be ordered through our website or by calling us at 877-967-2726.

Replacement parts and consumables are listed on the Buying Guide tab of their respective product pages. They can also be found by using the search bar at the top of the website.

Common Consumables Replacement Parts
Coin Cell Battery Pack pH Electrode
Carbon Paper Soaker Bottle Replacement pH/ISE (5 Pack)
Field Mapper Kit Replacement Cart Axles
pH Storage Solution Replacement Jumper Clips (Modular Circuits)


Video Library

From full product guides to bite-size how-tos, the Video Library hosts a variety of media to help you maximize your PASCO solutions.

Software Help Guides

Bookmark these handy software guides for quick access to answers during class time. Each guide is fully searchable, making it easy to find step-by-step solutions for most software questions.

Knowledge Base

The Knowledge Base is a treasure trove of resources for your most specific product questions. It’s consistently updated by our Technical Support team and includes answers to all types of FAQs—both new and old!

PASCO Technical Support

When you need personalized, step-by-step guidance, reach out to Technical Support. Our friendly team members are here to help via chat, email, or phone call during business hours.

PASCO Wins Best of STEM for 2023 Educators Pick Awards

We are excited to share that three PASCO products have been chosen as Best of STEM Winners!

Educators Pick Best of STEM is a program designed to rank and award outstanding innovations in STEM education with educators as the judges. Winners are chosen through an aggregate vote based on the criteria for the product category.

This year, PASCO submitted three entries which all won their category! Read about each of them below, and also check out the press release by GlobeNewswire here featuring PASCO Academy and our Meter Stick Optics Complete System: Science Educators Name PASCO Scientific as Best of STEM in Two Categories.

PASCO Academy | Best of STEM: Video-Based Learning

PASCO Academy is a comprehensive library of digital hands-on resources for students both inside and outside the classroom. There are three versions: Physics Academy, Chemistry Academy, and Biology Academy.

PASCO Academy is designed to do some of the heavy lifting for science educators by providing digital curriculum, including activities and resources, that integrates with existing classroom lessons. With PASCO Academy, educators have access to a plethora of distance learning curriculum, virtual labs, data sets, and on-demand PD, enabling them to pick and choose which resources to utilize.

PASCO Academy supports student learning by having them not only study science, but also do science: Students gather their own data, conduct data analysis, and use downloadable resources like instructional videos to develop and support their conclusions. They can even share their collected data to multiple devices (or stream it live!) to collaborate with their peers, as scientists do.

The PASCO Academy provides distance learning video segments, including a weekly overview video, a virtual lab investigation with corresponding student activities, and a follow-up video that ties the week’s learning objectives together. Registered educators have access to the Academy Portal, where they can access a library of distance learning videos, student labs, sample data files, links to relevant information within the included Essential curriculum, and more.

E-learning, hybrid classes, student and teacher absences, and short class times can limit the amount of quality hands-on learning that science students are exposed to. PASCO Academy is comprehensive enough that you can have your substitute teacher run the lab, keeping your class schedule on track when you can’t be there.


Meter Stick Optics Complete System | Best of STEM: Physics


PASCO’s Meter Stick Optics Complete System encourages student observation, measurement, and analysis of optics, all in a compact and simple system.

Component holders easily attach to the meter stick and include an indicator window so students can accurately measure their position. Lenses are built into cases with holding tabs to prevent fingerprints and add durability when students interchange them between holders. The system includes a bright, rechargeable light source that can easily be seen in a lit classroom, and the viewing screens are designed so the projected image is bright and clear.

The system’s compact and durable design allows students to quickly and accurately maneuver components, making multiple investigations possible in the span of one class period.


Coding with Vehicle Sensor Technologies Kit | Trailblazer Award: Cross-Curricular Coding

The //code.Node is a revolutionary device that uses Blockly, sensors, and feedback to teach students coding skills and data literacy. The pocket-size coding solution includes encodable sensors for light, motion, sound, and magnetic fields, as well as a speaker, RGB light, and 5×5 LED array. Using PASCO software and the //code.Node, students can create custom experiments that range from simple data collection to advanced, measurement-based sensory feedback. As they execute their code, students collect real-time data and visual feedback that helps them improve with each activity.

The Coding with Vehicle Sensor Technologies Kit is geared towards new coders with a simple wireless design that uses block-based coding, allowing students to focus on the basics of programming without worrying about syntax. The //code.Node Cart has a spinning magnet on its wheels that the attachable //code.Node detects, allowing students to determine the cart’s distance and velocity. Five thorough investigations are included in the kit, featuring video lessons and student worksheets, all accessible through a convenient digital flipbook.

The //code.Node lets students go beyond computer animations to controlling output devices like speakers and LED lights, and the included activities integrate live data collection and analysis so students are challenged to observe, question, and retest their theories.

STEM Education Inspires Teen to Solve the Food Transport Issue

On April 20th, 2023, yahoo!finance shared an inspiring story about a High School Junior from Illinois coming up with a solution to bring more produce to the grocery store shelves. Through her utilization of sensors, the teen tracked the ethylene measurements of the crop’s output and adjusted temperature and humidity levels to lengthen the crop’s lifespan. This revolutionizing idea significantly reduces the loss of crops from transportation, solving one of the world’s toughest problems.

To read more about this story, please visit ‘Solving the World’s Tough Problems Through STEM’.


Our Take…

What started as an inspiration from the teen’s STEM classes became the very first step in her journey to changing the world. The school provided the teen the necessary resources and support to embark upon her project. Hence, it is with great promise that with the right tools and motivation, any student from any school can become inspired, begin their own project, and then become the world’s inspiration.

This article made us think of PASCO’s Wireless CO2 Sensor, Temperature Sensor, and Weather Sensor and how these tools can be used beyond the classroom through solving the world’s toughest problems in agriculture and sustainability.

It is more than just learning a subject, it is the key that will spark innovation and creativity in more young minds. 

Growing Tomatoes With the Greenhouse Sense & Control Kit

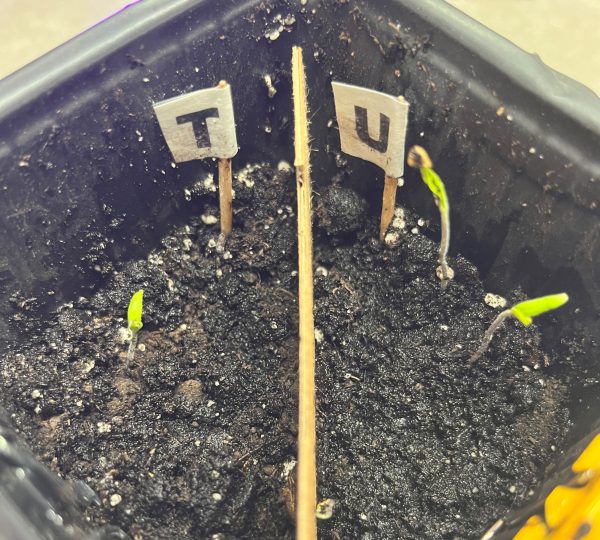
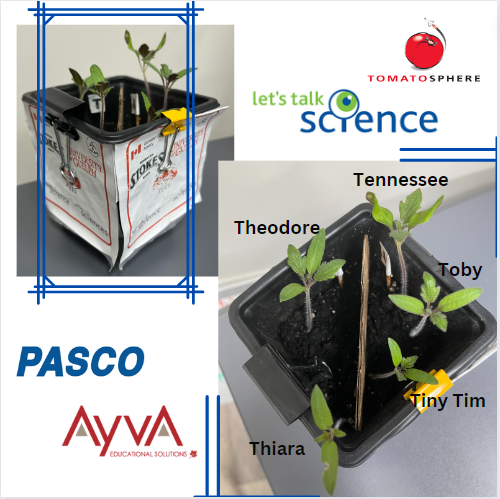
Over the last couple of months, AYVA Educational Solutions has been growing tomato plants from the Let’s Talk Science Tomatosphere project. In this project, you are given two unknown packets of seeds, labeled T and U. One packet of seeds have been to space, while the other has not. The purpose of this experiment is to germinate and grow the tomato plants from both packets, tracking their growth, and hypothesizing which plants are the space seeds! You can guess which ones you think are the space seeds in the survey at the bottom of this post! Submit your hypothesis and you will automatically be entered into a raffle to win a free PASCO Wireless Temperature Sensor! If you would like to find out which seeds have been to space we encourage you to participate in this fantastic program!! Sign up for your own packet of seeds here.

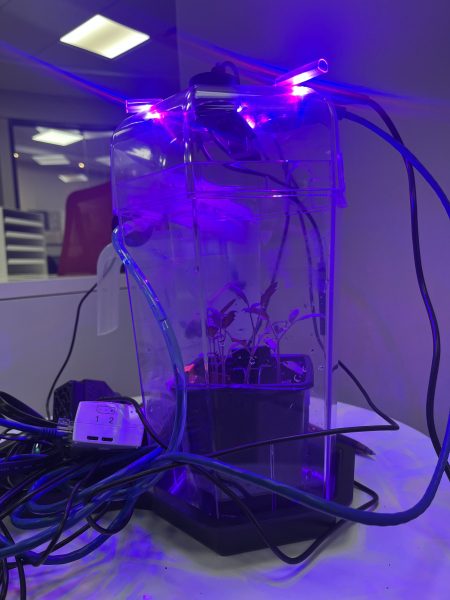
We used PASCO’s ST-2997 Greenhouse Sense and Control Kit to monitor and regulate conditions for optimal growth! By researching the optimal growing conditions for a tomato plant, we adjusted the levels of the greenhouse system to meet those needs.

Using Blockly, we block coded the Greenhouse conditions we desired, programming a 24 hour sunlight and watering cycle, and ensuring the temperature stayed at 23 degrees Celsius at all times. Once the code was exported into the //control.Node, we planted 3 seeds from each packet on the appropriate sides (T or U).

We tracked the growth of our plants from January 20th to March 31st, as they developed, they went from seeds to leafy plants.

After just one week of being inside the Greenhouse, three out of six seeds germinated and sprouted! As a couple more weeks went by, two more seeds sprouted. Unfortunately, one seed (on the T side) did not germinate. Overall totaling three plants on the U side, two on the T side. At this point, we hypothesized which of the seeds had been to space and which had not, and wrote down our predictions to compare to the results later on. You can share your predictions in the survey at the bottom of this post, and find out which seeds were the space seeds!

In the fourth week of growth we decided to name the plants so that they could be more easily identified, charted, and referred to. On the U side, we named the tomato plants Tennessee, Toby, and Tiny Tim. Then on the T side, we named the plants Thiara and Theodore. Tiny Tim was the smallest plant during the beginning of the growth period, while Tennessee was the largest of the seedlings. Thiara also germinated the latest of any of the seeds, excluding the one seed that never sprouted. She quickly caught up to the others though, and in the 4th week she was the 3rd tallest of them.

After 6 weeks of growth, the plants were beginning to falter as they combatted against one another for nutrients and water. To replenish what they lost, we decided to separate the plants. Three of the plants, Tennessee, Tiny Tim and Thiara were moved to their own pots. However, Toby and Theodore remained in the self-regulating greenhouse to continue identical conditions. Within days of separating the plants, they all began to look healthier as they received the nutrients and space that they needed.

Into the ninth week of the experiment, the plants are growing taller and broader. Now that they each have their own space, they are able to thrive. The featured photo on the right shows Tennessee healthy and strong! With no one contesting him for nutrients, he is tall, green and healthy. At this point, they are almost fully mature, and will be entering the flowering stage shortly. This week we decided to reveal the answer to the lingering question we had been wondering for months – which seeds had been to space? Was it Theodore and Thiara (T Side)? Or perhaps did Toby, Tiny Tim and Tennessee (U side) spend some time in space? Find out the answer below!

Shoutout to the PASCO Greenhouse, as this project could not have been as successful without it! The self-regulating greenhouse allowed us to grow the plants healthy and strong -with minimal intervention from us. We were able to germinate 5/6 seeds and maintain the ideal moisture and temperature levels for the plants to grow, even amidst a cold and dark winter with many days out of the office. PASCO’s Greenhouse is the perfect educational kit for your classroom, teaching students several ecological concepts such as photosynthesis, anatomy of plants, and the ways different conditions affect the growth of plants – all with the new focus and importance of coding. You can start the Tomatosphere project yourself, and facilitate it with the Greenhouse Sense and Control Kit as well.

Make sure to answer the survey below to find out which seeds have been to space and for a chance to win a PASCO Wireless Temperature Sensor! We would love to hear what you think, so share your guesses with us, and your reasoning if you have any!


Featured Products:

PASCO ST-2997 Greenhouse Sense and Control Kit

SPARKvue

Wireless Temperature Sensor


Tracking Acceleration During A Hockey Game

Acceleration and velocity are present everywhere in life, from sports to driving, to walking around. With PASCO’s Wireless Acceleration Altimeter, I decided to see what I can learn from the 7 different data points that it records.

As a hockey player for 18 years, I’ve always wondered how quickly I’m moving on the ice, having never seen myself skate or recorded my speed. I assume of course, that I am right up there with Connor McDavid in terms of speed. I expect the sensor to be able to confirm that for me, while also telling me even more information – my acceleration and velocity in the x, y, and z directions.

The first step in my experiment was to put the sensor into remote data logging mode, so that the altimeter is recording data into its internal storage, instead of needing to be connected to a phone or computer.

When setting up the altimeter, I changed the frequency to 5 Hz, (5 data points per second). The altimeter can record up to 200 Hz but has a limited capacity for how much data it can keep in its internal storage. Once I had put the sensor into remote data logging mode, I used the included Velcro straps to attach it to the back of my shin guard and got ready to step onto the ice.

For the first 9 minutes of the data recording, I am putting all of my equipment on, so the velocity and acceleration are relatively low as I stay within the dressing room.  At the 10-minute mark warm-up begins. For these 5 minutes, I’m constantly moving while I’m skating on the ice, so the acceleration is constantly changing and staying at numbers of higher magnitude.

The magnitude of the data is also slightly decreasing during the 5-minute stretch as I slow down and conserve more energy for the game. When comparing the peaks of this stretch to the peaks of acceleration later on, it’s clear that I wasn’t accelerating as much in warm-ups as I would be when I was playing the game.

At the 15-minute mark, the game begins and I’m on the bench for the first shift, but at 18.5 minutes I get on the ice. There are bursts of acceleration as I get up to speed and little sections of coasting until 19 minutes when there’s a stoppage in play and the acceleration goes down and remains relatively constant. When the play resumes my acceleration begins to spike and then fluctuates throughout the natural progression of the game, as I coast at times and race to get the puck at others.

Over the course of the rest of the game, the peaks and valleys of the graph show clearly when I was on the ice accelerating and decelerating, and when I was on the bench, with the little movement just being from sliding across the bench or standing up to cheer on a goal.
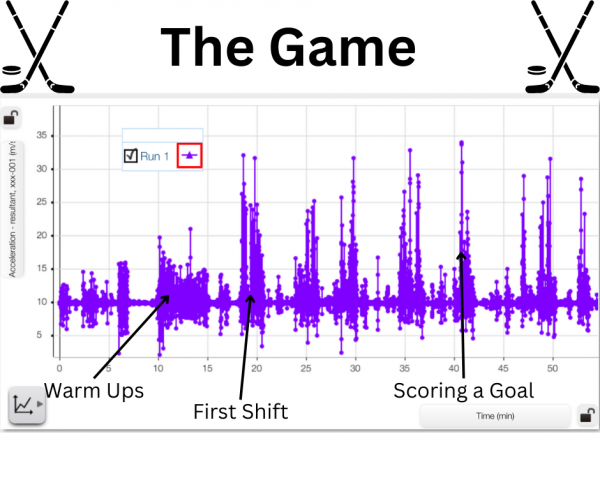
In the different peaks in the graph, it can be seen which shifts I accelerated the most, and which I had a bit less energy. On the first shift of the game, my peak acceleration is 32 m/s2, which is high, but not the highest acceleration of the game. On this shift though, there are 60 data points where my acceleration is greater than 15 m/s2.

Because we are recording at 5 Hz, we can take that to mean that there are 12 seconds in which my acceleration is greater than 15 m/s2. This is not all in one 12-second stretch though, it’s spread out throughout the shift in groupings or bursts of acceleration. By comparison, the shift with the next highest amount of data points over 15 m/s2 is my 4th shift, in which there are 50 such points, or approximately 10 seconds. This 2-second difference is evidence to point towards my fatigue, as the number of such data points decreased more as the game went on, with the final full-length shift containing only 34 of these points (6.8 seconds).

The highest acceleration recorded is 34 m/s2, and that is on the 5th shift of the game. It would seem abnormal that my highest acceleration would be on the 5th shift, as I am already more tired at this point. There is context to explain the abnormality though – on the 5th shift we broke out on a 2-on-1 and I had to accelerate as fast as I could to free myself up to receive the pass and score a goal.

Overall it was a very interesting and insightful experience looking into the data surrounding my skating and gameplay. While I don’t think my acceleration is quite up to par with Connor McDavid, I can say I’m satisfied with my results and happy that the data logging had ended by the time I ended up in the penalty box.

With the Acceleration Altimeter, there are so many cool and interesting ways to record and examine data, and I got a fascinating look at just one of the possibilities by taking it with me during my hockey game. Additionally, there are other data points that weren’t useful for my experience, with angular velocity, altitude, and acceleration in the z direction – playing hockey on a flat sheet of ice somewhat limits how much vertical movement can be performed. I’m excited to dig deeper into the data and for other possibilities and opportunities in the future to learn more, using PASCO’s wireless sensors.

Featured Products:

Wireless Accelerometer/Altimeter

SPARKvue

Save & Share Cart
Your Shopping Cart will be saved and you'll be given a link. You, or anyone with the link, can use it to retrieve your Cart at any time.
Back Save & Share Cart
Your Shopping Cart will be saved with Product pictures and information, and Cart Totals. Then send it to yourself, or a friend, with a link to retrieve it at any time.
Your cart email sent successfully :)